Space NK UK

Monday, 30 December 2013

15% off Urban Decay offer!!

I get sent details of many offers but rarely mention them. However this one is pretty special so I'm putting it out there for you all.

Look Fantastic have an offer for 15% off Urban Decay when you buy two products. They still have some of Urban Decay's best products left so Hurry! Hurry! Hurry!

Visit the Look Fantastic site HERE and enter the code COSM15 at checkout - easy peasy!

I've had a snoop around and these are my favourites:

The Urban Decay Black Market 24/7 Glide-On Eye Pencil set. Some of Urban Decay's most iconic pencils already reduced by 25% to £19.47 see HERE


Urban Decay Black Market 24/7 Glide-On Pencil Set - Black Market (Limited Edition): Image 01

There is also the amazing Urban Decay Eyeshadow Primer Potion that beauty bloggers rave about (I'm no exception!). I have it in Original but there are other variations too. £15 for a 11ml tube HERE


If you are a fan of the Naked series then you may like the Naked Flushed Blush palette. £20 HERE


This offer is valid until 3rd January so if you have any Christmas money left then don't hang around!

If this isn't enough then Look Fantastic also have some other offers on:

Visit their site HERE and get:
  • 15% off when you spend over £50 using the code NY15
  • 10% off using the code NEWOFF. 
  • If you need it for New Year's Eve get Free Next Day Delivery when you spend £50 with the code NEXT50.
  • PLUS if you spend over £60 they are also giving away Cow Shed Pamper gift sets worth £34.

Yes, you can thank me later.


MAC Monday: Brick-O-La Lipstick

It's MAC Monday time again! I have so many great things to choose from lurking in my stash, so I have enjoyed choosing this week's little gem. Last week I chose the Divine Night Fluidline in Deliciously Rich (see here) and this week's offering is also one of my most recent purchases. It is: MAC Brick-O-La Lipstick.

MAC Brick-O-La Lipstick

I was swatching my way round the MAC store looking for the typical winter plum colour when I spotted this. I am fair skinned and I find that colours look far louder and darker on me than they seem to on others. I had done the usual Googling for some plum lipstick suggestions so I already had a shortlist in mind. Rebel was too dark on me, I already have Plumful (which is more pinky/purple) and Craving was a little too pink (although I may revisit that on my next MAC visit...).

Then I found Brick-O-La! It is more on the red and brown scale which is far more within my comfort zone but it does have a hint of pink. I already have Mocha which is a firm favourite which is more of a peachy brown, but Brick-O-La has just the right hint of pink to put it in the berry/plum category.

I seem to avoid blue toned lipsticks - given my colouring I don't know why I can't pull them off and God knows I'd enjoy the teeth-whitening effect. But a Barbie pink lip is my idea of hell. Plumful is almost a little too pink/purple for me but Brick-O-La is the perfect winter berry colour I was searching for.


Brick-O-La is one of MAC's amplified finish lipsticks. If you aren't familiar with all of the different finishes, the amplified finish is creamy and shiny but with an intense opaque colour. You can of course soften the look if you blot or smudge it on, but they are great to create a bold colour as they are really pigmented. One coat is really enough for full colour. They last pretty well too without being drying on the lips. This is perfect for me as I hate to reapply constantly throughout the day and besides I prefer to keep my MAC treasures safely in the drawer not bashing around the bottom of a handbag.

I love the black bullet shape and the outer cardboard packaging that MAC lipsticks have. I will admit I do keep them in the boxes as I like to stash them vertically in a drawer so I can read all of the names.... (I know!). It does of course also have that familiar MAC vanilla smell which I really like too, although it is quite subtle and has no taste to it. Some brands really ruin a great lip product with a really pungent smell or taste - MAC is not one of them thankfully.

MAC Brick-O-La Lipstick

On the lips it is bold enough for night time but also a colour that you can pull off in the day. For those of you with darker skin tones this is a great warm colour too and would just look quite natural.

What are your favourite MAC lipsticks? If you would like to join me in a little MAC Monday lovefest each week, then send me your links and I can include the links here.

You can get hold of MAC Brick-O-La for £15 with free delivery (for Beauty Card members) here.

Monday, 23 December 2013

MAC Monday: Divine Night Fluidline

Welcome to my first ever MAC Monday!

I will come out and say that MAC really is my make-up first love. In honour of this I decided that each Monday I would post about one of my favourite products under the guise of MAC Monday. So plunging straight in, where better to start than my most recent purchase.

MAC Divine Night Collection

MAC released their Divine Night limited edition range back in November. Most of it sold out immediately (including a beautiful plum lipstick called Private Party which I only discovered too late - when its gone, its gone!).

It was whilst I was stalking this elusive lipstick at various MAC counters and shops, that I saw the three Fluidlines that are part of the collection. There were 3 shades:  

Deliciously Rich - a glittery bronze
Macroviolet - a deep smoked shimmery purple 
Stares and Speculation - a dirty shimmery gold.

MAC Fluidline in Deliciously Rich

MAC Fluidlines are basically gel eyeliners, but you can also use them as a cream eyeshadow or a base for shadow. I hadn't tried one before, but the girl on the counter was wearing Deliciously Rich as a cream eyeshadow all over her lid. It was dramatic and impressive - I instantly bought one.

Fluidlines comes in a glass pot with a screw top lid, which for this sort of product is vital to stop it drying it out (I had an expensive Bobbi Brown gel eyeliner which dried out quite quickly which is so disappointing when you've forked out circa £18!). I did read that if you store them upside down it helps to prevent drying out - it might be worth a try?

I really liked how the cardboard outer packaging has gold lettering as it is part of the limited edition collection. I do tend to keep MAC products in their outer cardboard boxes as I just really like the uniform feel of them and I like to keep them as a collection (did I just admit that out loud?!). I told you it was my first love...


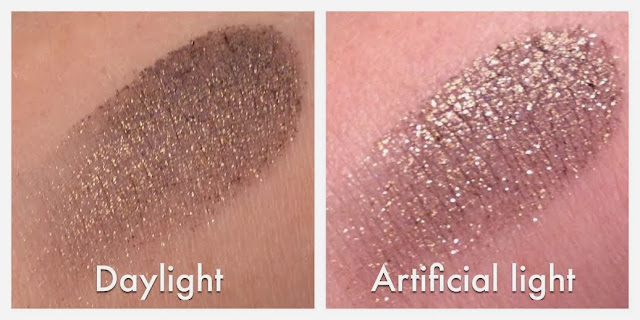
Deliciously Rich is a deep brown with a bronze-gold shimmer. The above swatch in artificial light shows just how beautiful it is when it catches the light.

As soon as I got my little MAC package home I experimented with it as a liner using my MAC 210 Fine Liner Brush. As I suspected the shade was too pale to really define the eyes, although it could add some shimmer over a darker liner. However this did not dampen my ardour - I'd bought it to use as a cream shadow and that it exactly what I did next.

MAC Fluidline in Deliciously Rich as an all over lid colour


I primed my lids using Urban Decay's Primer Potion in Original and applied the Fluidline over the lid with my finger and then used a matte warm natural brown eyeshadow (MAC - Soft Brown) and a MAC 217 Fluffy Blending Brush to blend it into the crease. I finished it off with some brown liquid liner and a couple of coats of black mascara.

MAC Soft Brown eyeshadow is the perfect transition colour for this look, as it adds some warmth which prevents the darker colour from washing me out. Being fair skinned I often find that a warm colour through the crease helps me carry off cooler tones that otherwise would just make me look tired. The only problem is that this shadow is discontinued in the UK so I had to find one from the states on Ebay. There are of course plenty of alternatives but I haven't found one I like quite as much as MAC's Soft Brown.

The Fluidline is soft and creamy, but it sets really quickly so you have to work fast to avoid patchy eyelids. Using the Soft Brown shadow and the 217 Blending Brush really helped rectify some initial patchiness. Close up in the pictures above it looks like quite a subtle eye but from a distance has more impact as a smokey eye. You could of course layer it up to create a more dramatic look. The colour works really well against blue eyes and finished off with a neutral lip is a combo ready for day or night.

I also have the more budget-friendly Maybelline Color Tattoo 24hr Cream Gel eyeshadows in various shades (they have gone with the American spelling of colour just to confuse us!). MAC's Deliciously Rich is closest to Maybelline's On and On Bronze, although I would argue that MAC's Fluidline gives a denser more intense colour.


MAC Deliciously Rich vs Maybelline On and On Bronze

I have swatched them both above to compare - and in the flesh the MAC Fluidline was more intense with more sparkle, but the Maybelline is perhaps more photogenic as it holds its own in the photo. Certainly in formula the Maybelline Color Tattoo is much softer and easier to blend but the MAC Fluidline sticks where it is put and is bolder albeit trickier to work with as a cream shadow. There are similarities but because they are at vastly different price points (around £5 for Maybelline and £16.50 for MAC) that may sway you if are thinking about buying one.

Personally I think there is room for both - Maybelline Color Tattoo as an every daytime shade but MAC Fluidline as a bolder night time colour or to layer up as a shimmery liner. The Maybelline can be blended out into a subtle wash of colour but the MAC Fluidline is best as a more intense look.

The other Divine Night Fluidlines have sold out everywhere, but you can still get hold of Deliciously Rich from the MAC website here or from Debenhams here (if you want to use/redeem your Beauty Club points and get free delivery). You can see the full range of Maybelline Color Tattoo 24hr Cream Gel eyeshadows here.

What do you think - have you tried any of these? I would love to see your tutorials and finished looks so do leave your links below.

Wednesday, 18 December 2013

Max Factor: The Face Gift Box

Last week I went Christmas shopping with my mum. Whilst swinging through the make up aisles in Boots we noticed that Max Factor were giving away a free gift if you spent over £15 on their products. Lucky old me! Mum wanted a couple of things and I was the lucky recipient of the gift box.


Inside there are 3 products and some discount vouchers for £3 off of the Whipped Creme Foundation. Vouchers are all well and good but it is the products that are the real draw, as only too often the voucher remains unused and dog-eared in a corner of my wallet.


The free gifts were 3 full sized products for eyes, lips and nails. There was a Max Factor False Lash Effect Mascara in black/brown, a Max Factor Lipfinity Lip Colour in 340 - Essential Natural and a Max Factor Glossfinity Nail Polish in Cobalt Blue.

I was especially pleased with these items as I have been wearing Lipfinity Lip Colour for years and have been trying to chose a more natural colour so I hoped this could be it! Likewise I have been using a different Max Factor mascara for a while which has been amazing and so I was keen to give this one a try. As for the nails, well I have an ever expanding, rammed drawer of nail polishes in all colours. But blue is not a real favourite nail colour of mine. However I will give it a whirl to see what the formula and application is like. (Right now I'm still sporting my silver glitter nails that I posted about the other day. The manicure is still going strong on its 5th day and I'm not ready to surrender it just yet.)

Lipfinity Lip Colour in 340 Essential Natural

My favourite of the 3 is undoubtedly the Lipfinity Lip Colour. I'm sure the girl in store mentioned that this shade 340 - Essential Natural was a limited edition, in which case I am really pleased I snagged this gift box. 

If you aren't familiar with the Lipfinity Lip Colour, it comes in two parts - a liquid colour with a wand applicator, which dries matte and a twist-up clear balm stick. You apply the clear balm over the colour base once it has dried. You can also reapply the clear balm throughout the day to add shine and moisture.


Max Factor Lipfinity in 340 - Essential Natural

You have to hand it to them, they couldn't have chosen a more apt name if they'd tried. It is a long wearing lipstick that is for sure. If you don't believe me - just swatch it in store, let it dry then try your best to scrub it away... I promise you, once dry this stuff really does not budge. That said, you really want to be careful with your application as smudge from this isn't something you can quickly rectify as you dash out of the door.

I have seen negative reviews of Lipfinity online and it seems to be a bit of a marmite product. I love it because there is a huge range of colours to choose from, it needs one application a day, it survives food & drink and even a whole night's sleep. I have literally used tube after tube of this stuff over the years.

However, some cautionary notes. The trick for success rests with the application. You need clean dry lips - no primer, no balm and no foundation. You must apply the colour base in an even layer that isn't too thick. Work quickly before it dries and whatever you do don't be tempted go back and apply a second layer. If you do it will go lumpy and flaky and horrible. Trust me - I once witnessed a friend wrestle with this reapplying several layers in a bright red shade and it wasn't pretty.

I will do a post on all the shades I have soon, but I have found the darker colours have better lasting power. I will admit that over time the colour flakes, but you can reapply the clear balm to help with this. Frankly if one colour application at breakfast time is still visible at bedtime I can withstand a little flaking.


Max Factor Lipfinity: Results over time after 1 application at 7am

To demonstrate it I did a little test throughout the day. I applied it 7am and ate and drank as normal throughout the day. I think I only bothered to reapply the balm once during the day but by 11pm you can still see the colour albeit a bit flaky, but for 16 hours wear that is not bad at all. Obviously unless someone is peering really closely at your mouth the flaking wouldn't really be noticeable. It just depends whether this bothers you or not.

False Lash Effect Mascara in Black/Brown

I will say from the off that I like this mascara but I don't love it. Recently I have been singing the praises of the Max Factor Clump Defy Mascara which I think gives much more of a false lash effect than this one.

To start with I do usually prefer to use a black mascara rather than brown. My colouring is fair with blond hair and blue eyes, so theoretically I am more suited to brown. Oddly I prefer a brown eyeliner but my mascara is always black. My lashes are naturally quite dark though so perhaps that helps me carry it off.

Max Factor False Lash Effect Mascara wand
The wand of the False Lash Effect mascara is quite chunky. I always find these messier to apply as the risk of smudging up your eyelid is greater and this was no exception. You can see from the pictures below, the mascara gave a nice natural look. But it is nowhere near the impact that I have easily achieved with other mascaras. Whether it is the wand, the formula or the application I don't know. Lily Pebbles recently wrote a great series of Mascara Workshop posts which discussed all of these factors - take a look and see what you think.


Max Factor False Lash Effect Mascara in Black/Brown

Glossfinity Nail Polish in Cobalt Blue

Glossfinity promises glossy nails for 7 days and if its staying power is anything like Lipfinity then this will be a good find. I haven't tested it yet but in this post, Really Ree tested a different shade and confirmed impressive lasting power throughout the 7 days. I will keep you posted when I decide to dip a toe (or a finger) into the world of blue nails.

All in, Max Factor's The Face Gift Box is a great freebie. The lip and eye products are quite subtle to contrast against the bold nails and if you are interested in the Whipped Creme Foundation you can make use of the £3 off vouchers.  It is a pleasant surprise to get a wearable lip colour in a free gift. I have a collection of dodgy pinks and frosted lipsticks from free gifts which will never see the light of day.

You can get your hands on this free gift when you spend £15 or more on Max Factor products at Boots here for a limited time only.

What do you think? Have you tried this box or are there any other great free gifts floating around at the moment?

Monday, 16 December 2013

Diego Dalla Palma Lip Gloss

I have only recently taken notice of the new-ish beauty hall in my local Marks and Spencer. Traditionally I would've rushed there to buy some lily of the valley something or other or similar for a gift for my mum. But I wouldn't have considered paying premium prices for make up products. This time though I was pleasantly surprised.

The new Marks and Spencer beauty hall stocks several ranges including their own Autograph brand. But it was the diego dalla palma range that really caught my eye. Perhaps it was the stylish minimalistic monochrome packaging or the sharp lines of the chunky lip glosses. (Muji acrylic storage containers have the same effect on me - I don't know why it's just a personal aesthetic thing!).

Diego dalla palma is an Italian brand from Milan, which started in the 1970s. To be honest this is the first time I have come across it, but a little internet digging has shown that some of their products are well known and stocked elsewhere in the UK such as Debenhams.

Diego dalla palma: Gloss Your Lips & The Gloss

Specifically it was the lip glosses that really caught my eye. There were two gloss ranges on display; Gloss Your Lips and The Gloss.

I got quite swatch happy testing them all out. The Gloss Your Lips glosses have an iridescent shine where as The Gloss glosses are shiny but rich in colour and have a lip plumping effect. Personally I prefer the effect of The Gloss range as I'm not keen on frosting or sparkle on the lips.

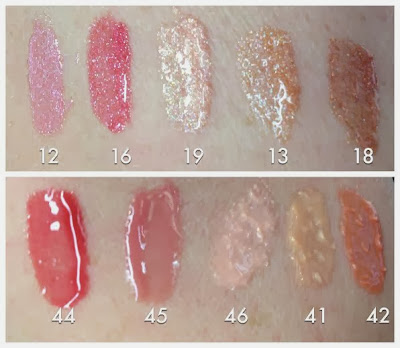
Top: Gloss Your Lips swatches.  Bottom: The Gloss swatches
Gloss Your Lips:
12 - Glitzy Pink
16 - Glitzy Pomegranate
19 - Glitzy Powder Pink
13 - Glitzy Gold Beige
18 - Glitzy Bronze

The Gloss:
44 - Red
45 - Mauve
46 - Milky Rose
41 - Cameo
42 - Natural Skin Pink
(The Marks and Spencer website has an additional colour 43 - Burned Brown, which was not on display in store but you can see it here).

Both glosses claim not be sticky and indeed they did seem to set to more of a waxy feel. I'm actually not usually a big gloss fan as I can't bear getting your hair stuck in your lip gloss and the colour completely disappearing after one sip of a drink. But those that set seem to have greater longevity on the lips and I find these tempting. These are purely glosses though rather than a gloss that leaves a stain behind.

My two favourites were 46 - Milky Rose and 42 - Natural Skin Pink from The Gloss range. Both are quite natural tones with 46 a paler natural soft pink and 42 a warmer my-lips-but-better colour. I am also really drawn to 45 - Mauve which was a nice pinky plum. Although I think mauve is a misleading description as it was actually a warmer colour than that.

At £14 these are at a high-end price point in line with my beloved MAC. So I am keeping an eye on these to hopefully pick a couple up after Christmas should there be any beauty discounts.

You can find the full range of diego dalla palma cosmetics online at Marks and Spencer here. You can also buy directly from the diego dalla palma website here as they do ship to the UK, although the prices do seem to be a few pounds more expensive.

Have you tried these or any of the other diego dalla palma range? Are they worth the premium price? I would love to hear your thoughts and recommendations.

Saturday, 14 December 2013

Christmas Silver Glitter Nails

I really am all about Essie Set in Stones at the moment. The flecks of silver glitter are of different sizes and this creates an amazing splatter effect. Plus a real bonus is that it doesn't feel gritty on your nails.


L-R Essie Set in Stones & Essie For the Twill of It

Last week I created a Christmas Nails look by layering it over a red polish (see here). This week I was curious to see how many layers of glitter would be needed for a really opaque effect - just like a glitter bauble.

After a clear base coat I created a base layer using Essie For the Twill of It. This is a beautiful duochrome polish which changes with the light. It is a dark grey but with hints of blue, green and mauve - it reminds me of oil catching the light. It only took one coat to be fully opaque and the brush made application really easy as it was wide and slightly curved.


Over the top of Essie For the Twill of It I started to layer up the Set in Stones glitter. In the end I went for 4 coats until it was pretty dense. Finally I slapped on a coat of my trusty of Sally Hansen Insta-Dry to set it and I was done.


Close up of the glitter - 4 layers

I'm really pleased with the finished result it is exactly the silver bauble effect I was hoping for. Using a darker base coat really brings out the glitter. I may need a chisel to get it all off though.


What do you think? Any tips for the best way to remove glitter polish...?

Wednesday, 11 December 2013

Naked Palette 3 - ONLINE NOW AT DEBENHAMS with 10% discount!

DROP EVERYTHING...

If you've seen my twitter feed you will know I have been stalking this cloak and dagger release for days.

But GO !GO! GO! - the Urban Decay Naked Palette 3 is available online now at Debenhams. Best of all they've applied the 10% discount PLUS you can collect/gain Beauty Club Card points. I just got mine for just £28 with free delivery!

BUY IT NOW BEFORE THEY GO!!!! Get it HERE

Put to the test: Bourjois Magic Nail Polish Remover

Bourjois Magic Nail Polish Remover

 I was curious about this mystical pink pot as soon as I spotted it in Boots nestled at the bottom of the Bourjois display. A few visits later curiosity got the better of me and I took a closer look.


It is a nail polish remover which claims to remove your nail polish in just one second with minimum effort. Inside the pot is a sponge saturated with polish remover. You put you finger into the hole in the middle of the sponge and twist, and the combo of chemicals and friction should take the polish right off.

The sponge inside is saturated with remover

At £4.99 it is pretty pricey for a nail polish remover compared to my usual Sally Hansen remover at less than £2. So I was good and resisted for a while, but eventually caved in last week during one of the 3 for 2 offers in Boots.

I couldn't wait to put it to the test. As soon as I got it home I tested it on the polish I was wearing - and yes it was pretty impressive. Finger in, swipe each way and the polish was gone. But the real test is the dreaded glitter polish removal. Tedious previous efforts of scrubbing away at stubborn glitter with cotton wool make this the holy grail product - if it works...

In my recent Christmas Nails post I used a chunky glitter polish - now on day 5 it was starting to chip and look a bit shabby. So I thought I would set the Bourjois Magic Polish Remover to the test.

Top L-R: Before & after 1 swipe, Bottom L-R: After 2 swipes & 3 swipes


You can see from the rather grizzly looking pictures above that the Magic Nail Polish Remover did a pretty good job, apart from on the chunky glitter pieces. I treated each 'swipe' as a good wriggle around in each direction, but less challenging polish wouldn't need as much.

So in the end I had to cave in and go back to my old faithful Sally Hansen remover to get rid of the dregs. But I don't consider this a failure for the Bourjois Magic Nail Polish Remover, it certainly did the bulk of the job. I do have a couple of doubts though - I don't know what happens to all of the gunk that comes off of your nails, and I wonder how long it will last before it dries out.

I will keep it for removing normal colour polish rather than texture or glitter. Plus it will be amazing for those quick fixes when you scuff a nail and need to remove and repaint, without risking soaking your other perfectly painted nails with remover - we've all done it.

Now if only they made one for toes so you can redo your toenails without taking your fingernail polish off in the process!

Bourjois Magic Nail Polish Remover is available at Boots for £4.99 for 75ml.

Monday, 9 December 2013

Primark Beaded Clutch

As usual I was supposed to be Christmas shopping for other people when this little sparkly number caught my eye. I only made it just inside the door of my local Primark when it stopped me in my tracks.


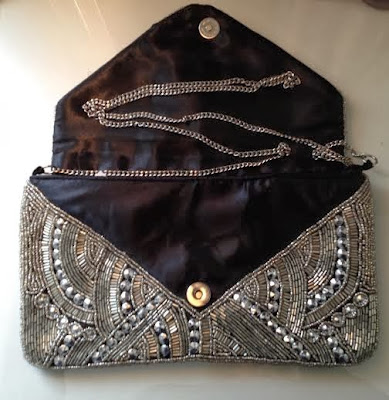
 I was pleasantly surprised to find such an intricately beaded bag in Primark. It is a perfectly sized clutch, sufficient for your wallet, phone and all the various other bits that sneak their way in. Plus it had a small zipped pocket which I always find useful to stuff a lipstick or other small things in that would otherwise scatter all over the floor.


I really love the antiqued silver / pewter colouring of the beading, plus the beading gives the bag a heavier more luxurious feel. Somehow it felt more like something from Accessorize than Primark to me and it was only £10.


The bag also has a fine chain strap which can either be tucked inside to use it as a clutch. Or I guess you could use it as a shoulder bag, but personally this is too reminiscent of 80s handbags for me (and yes I realise that is back 'in' but it reminds me of my friends' mums when I was a child). The strap is also just about long enough to wear it as a cross body bag too should it take your fancy - although not sure how well that works with a more delicate style of bag like this.

One gripe is that there is no zip across the top of the bag. The clasp is magnetic which gives it a stronger hold, but I would be a teensy bit nervous about small or flat things slipping out unnoticed. I did also wonder how strong the strap would be once loaded up, seeing as it is only Primark. But then it isn't exactly destined for heavy use.


Amazingly despite loving it I walked away - rationalising I didn't 'need' it. But pah! I was straight back the next day to buy it. Thank God I did as the whole rack had been sold and I nabbed the last one. Now I'm just waiting for an occasion to use it.

Friday, 6 December 2013

Christmas Nails

There is something about the approach of Christmas that makes me want to smother my nails with glitter until they look like something suitable to decorate the tree. But I think there is no time for subtlety until New Year's Eve is just a memory.

Thankfully at this time of year the shops stock up on glittery supplies to fuel my fire. (In turn I also stock up on remover - glitter is hell to remove.)

This year the sparkle of choice has been Essie's Set in Stones. Described on their website as 'Disco Mirror Ball Chaos' what is not to love?


It is a clear varnish with silver glitter of different sizes, from small flecks to 1mm diameter hexagons.I like how your nails have the effect of tiny paint splats all over them. You can also layer it up to create a full on glitter bauble effect.

In its first outing I created the nude nail with sparkle tips - which other bloggers are hyping as the look of the season. To do this I used 3 layers of a sheer pink nude - Bourjois So Laque in the shade Rose Lounge. One coat of Essie Set in Stones on the top third of the nail. Then two minutes later a coat of the wonderful Sally Hanson Insta-Dry - touch dry in 30 seconds, a life saver for preventing scuffs and smears.


Despite the chunky glitter in the Essie Polish it still feels smooth to the touch, perhaps helped by the Insta-Dry topcoat. A real pet hate of mine is glitter polish that feels gritty or too textured.

For my second effort I was feeling bold, so this time I layered the glitter over the top of a bright red - Rimmel Double Decker Red. (I have 3 bottles of this polish now thanks to an enticing Rimmel 3 for 2 currently running in Boots.)


It certainly is bold! Mind you it's the kids' Christmas Fair tonight, so it could shock a few of the more conservative mums - or if I bottle it I can pretend it is Christmas fancy dress...